

Automate Rilldata Gmail CSV Reports into Google Sheets with Make.com (Incrementally)
A step-by-step build that pulls a scheduled CSV from Gmail, keeps only one account's rows, and adds only new or changed data to Google Sheets.

Many ad platforms and analytics tools can email you a scheduled CSV report, but they won't write it to a spreadsheet for you. If you build dashboards in Looker Studio or Power BI, you want that data sitting in Google Sheets, growing each day, without duplicates.
In this post I'll show how I built a Make.com scenario that:
- Finds a scheduled report email in Gmail by sender and subject
- Downloads the CSV attachment
- Keeps only the rows for one account (filtering on column A, Account Name)
- Compares the rows to what's already in the sheet
- Adds new rows and updates changed rows, so re-running never creates duplicates
The problem with "just append"
The obvious approach is: email arrives, parse CSV, add every row. It breaks quickly:
- Scheduled reports often overlap. Today's file repeats yesterday's dates.
- Platforms restate numbers for recent days, so an old row can come back with different values.
- Appending everything gives you duplicates and wrong totals.
So the scenario needs to be incremental: add what's new, update what changed, ignore what's identical.
The approach: a signature column
The trick is a helper column in the sheet, which I call Signature. For every row it stores all the values joined into one string:
[Account|Campaign|2026-11-01|1200|34|...]
Then the scenario compares each incoming CSV row to the signatures already in the sheet:
| Situation | What it means | Action |
|---|---|---|
| The first three fields (the key) are not found in any signature | Brand-new row | Add a row |
| The key is found, but the full signature is different | Numbers were restated | Update the row |
| The full signature is found | Nothing changed | Do nothing |
The key is the combination of fields that uniquely identifies a row. For a daily campaign report that is usually Account + Campaign + Date. Choose whatever is unique in your report.
Prepare the Google Sheet
- Create a tab (for example
ReportData). - Put your CSV headers in row 1, in the same order as the CSV columns.
- In the column right after your data, add the header Signature. For a 15-column CSV that's column P.
Don't skip the Signature header. If the cell is empty, Make can't resolve that column in its filter and you'll get an error like
Unable to parse range ... undefined2:undefined1000000.
The scenario, module by module
The scenario uses only native modules, with no iterator or custom code.
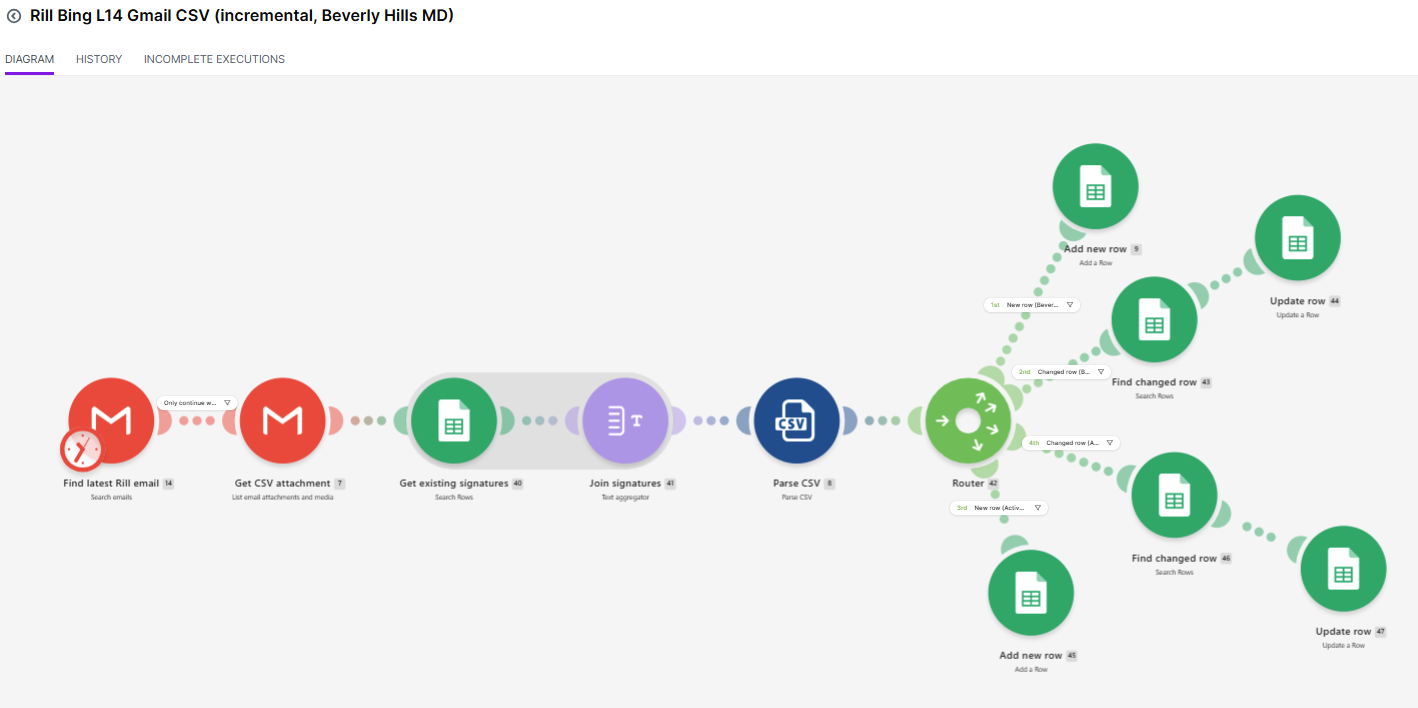
1. Gmail: Search emails
Use a Gmail search query to find the latest matching email:
from:noreply@example.com
subject:"Your Scheduled Report Name"
has:attachment
filename:csv
Set Limit to 1 so you only process the latest report. The subject:"..." form with quotes matches any subject that contains that phrase.
2. Gmail: List email attachments
- Message ID:
{{1.id}}from the previous module - Include: attachments
- Return attachment data: Yes
Add a filter on the link that only continues when the message ID exists, so the scenario stops cleanly when no email is found.
3. Google Sheets: Search Rows
Read the existing rows from your tab, with no filter. This is only used to collect the Signature column.
4. Tools: Text aggregator
Feed it from the Search Rows module and map the Signature column as the value. Use a newline as the row separator. The output is a single text block containing every signature already in the sheet.
5. CSV: Parse CSV
- CSV: the attachment data from step 2
- Delimiter: comma
- Contains headers: Yes
The parsed fields come out as col1, col2, col3, and so on, one bundle per CSV row.
6. Router: two routes
Both routes start with the same filter, so only your chosen account gets through:
{{col1}} Equal to (case insensitive) Your Account Name
Route A: new rows
Filter (all conditions must be true):
col1equals your account name- the text aggregator output does not contain
[{{col1}}|{{col2}}|{{col3}}|
Then add a Google Sheets: Add a Row module. Map col1...col15 to columns A to O, and map this to the Signature column:
[{{col1}}|{{col2}}|...|{{col15}}]
Route B: changed rows
Filter:
col1equals your account name- the aggregator output contains
[{{col1}}|{{col2}}|{{col3}}| - the aggregator output does not contain the full signature
Then two modules:
- Google Sheets: Search Rows with a filter on the Signature column containing the key prefix, and limit
1. This finds the row number to update. - Google Sheets: Update a Row with the row number from the search, writing the new values and the new signature.
Gotchas I hit
- "Module Not Found" after importing a blueprint. My first version used an Iterator on the attachments array. Module names and versions in a hand-written blueprint have to match what your Make region actually offers. The fix was to copy the module identifiers from a working scenario and use List email attachments directly.
undefined2:undefined1000000range error. This came from the Signature column having no header, so the filter could not resolve it. Add the header, then reselect the column in the filter dropdown.- Reselect connections after importing. A blueprint carries connection IDs from the account it was exported from. If Make doesn't recognise them, pick your own Gmail and Google connections in each module.
- Prefer the dropdown over typed IDs. If a Sheets module complains, choose the spreadsheet and sheet by name from the dropdown instead of pasting an ID.
- Pick a real unique key. If two different rows share the same first three fields, one will keep overwriting the other. Add more fields to the key if needed.
Scheduling
Set the scenario to run on a schedule that matches your report. If the report arrives once a day, running every 15 minutes wastes operations, since the key check will skip identical rows anyway. A daily run an hour or two after the email normally arrives is enough.
Testing checklist
- Run once with the email in your inbox and confirm rows are added.
- Run it again. Nothing should change, and no duplicates should appear.
- Edit one number in the Sheet's Signature-tracked row, or wait for a restated report, and confirm the Update route fires.
- Send a test email with a different account name and confirm its rows are ignored.
Wrapping up
With a Signature column and a three-way comparison, a plain "email to sheet" automation becomes a reliable incremental data pipeline: no duplicates, restated numbers handled, and only the account you care about in the sheet. From there, connect the tab to Looker Studio, Power BI, or any dashboard you like.
If you adapt this for your own reports, the two decisions that matter most are your key fields and your account filter. Get those right and everything else is plumbing.
About the author
- A Freelance Dashboard Developer
Comments
Join the discussionNo comments yet. Be the first to comment.